How to Setup Be Connect with Microsoft Teams SIP Trunk
Be Connect Cloud Telco Portal allows you to Setup with Microsoft Teams SIP Trunk. Using Be Connect Microsoft Teams SIP Trunk helps your organisation with Direct Routing feature. By pairing Microsoft Phone System with Teams Direct Routing and/or Calling Plans to enable call control and PBX capabilities in Office 365, businesses can effectively replace their on-premises telephony hardware with Teams, moving their PBX function to the Cloud.
Direct Routing allows organizations to select a third-party service provider like Be Digital’s service Be Connect to provide voice lines to their Microsoft 365 Tenant, enabling them to use Teams to make and receive phone calls.
Benefits of Direct Routing include:
- Make and receive calls directly in Teams with Direct Routing or combine with a Calling Plan*
- Easily configure existing voice lines to work with Direct Routing.
- Microsoft certify SBC providers and their solutions to ensure highly reliable telephony.
- Easily connect existing legacy hardware such as third-party PBXs to Teams and Direct Routing.
*Calling Plan not available in NZ.
*All services require Microsoft Business Standard / E1 / E3 + Microsoft Phone System licensing or Microsoft E5 Phone System Licensing.
Note: Pre-requisite: Ensure you have assigned Microsoft License to your Microsoft Account.
Follow below instructions to setup Direct Routing on Microsoft Teams using Be Connect Portal:
- Login to Be Connect web portal.
- Make sure you atleast have 1 x Cloud PBX number.
- Click on Teams Tab & Click Add Trunk.
- Type the Trunk Name, Ideal format is “Companyname-BD-Trunk”
Select Simultaneous Calls from Dropdown this specific number of calls you expecting your organisation team to make at any given point of time. - Click on “Use Available Balance” & Click on “Make Payment” button.
- Setup Login, Click on Guided Option.
- Configure Trunk, In this step you need your domain TXT record, follow below sub steps and then click on record TXT button.
How do I add FQDN to Office 365
Register The FQDN in your Tenant and enter in the TXT record.
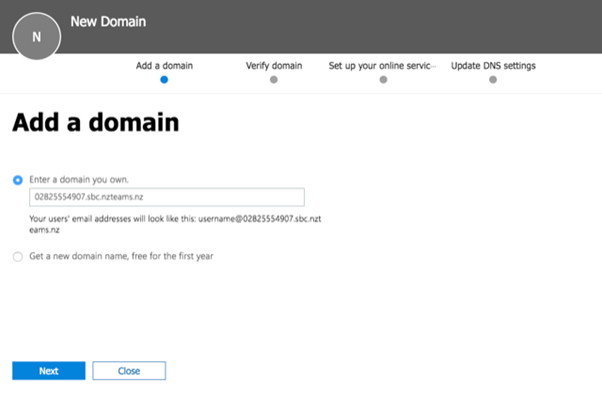
- In the Microsoft 365 admin center, go to Setup > Domains > Add domain.
- Select the “enter a domain you own” radio button and enter 02825583002.sbc.nzteams.nz then click next.
- Copy the TXT record and paste it in the TXT record field in this wizard then press Record TXT.
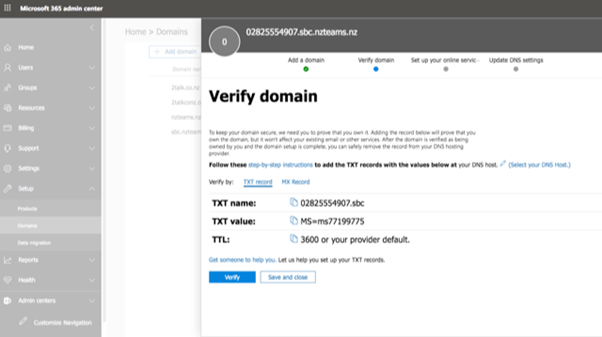
- Click Done after following below steps.
How do I check FQDN to Office 365
Register The FQDN in your Tenant and enter in the TXT record.
- Click verify untick all boxes and complete the wizard in the 0365 Portal.
Activating the FQDN
Activate the FQDN by adding a single user in the Tenant against the FQDN you just verified.
- Fill out the new user form, using Activation as the new username and the new FQDN as the domain, apply a valid set of licenses, click add then save and close. The FQDN is now activated.
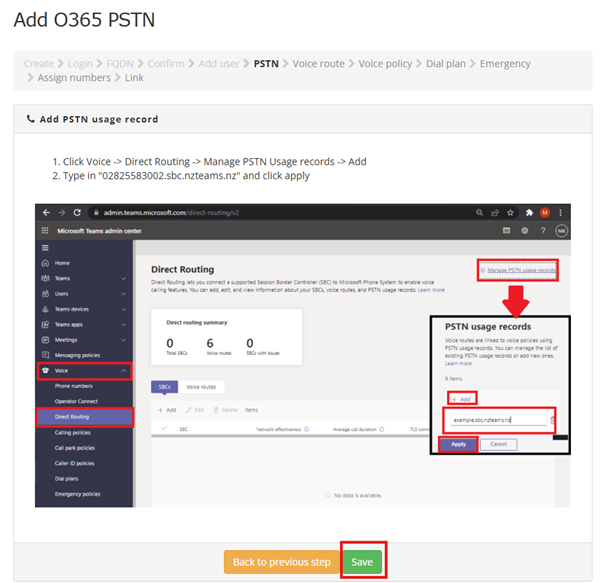
- Add PSTN Usage Record after following below steps in Microsoft Teams Admin Center Page & Click on Save
- Click Voice -> Direct Routing -> Manage PSTN Usage records -> Add
- Type in “02825583002.sbc.nzteams.nz” and click apply
- Add Voice Route.
*This step can be run in either CloudShell or Powershell (Using latest Microsoft-Teams module)- Click the CloudShell icon at the top right of the screen
- *If you do not have a storage account associated with your tenant you must add one to access the CloudShell, you can add one to your account by following the prompts.
- Copy the code block below and paste the contents into the CloudShell window and press enter, you will be prompted to enter in login details of your Global Admin account enter in these credentials now.
- Open PowerShell on your Computer.
If you haven’t connected to Skype for Business PowerShell before, could you please download and install: https://www.microsoft.com/en-us/download/details.aspx?id=39366
Get-Module -Name MicrosoftTeams -ListAvailable - Restart PC
- Open PowerShell on your Computer. Run the following command and sign in using your O365 global admin account to connect:
import-module MicrosoftTeams
Connect-MicrosoftTeams
$credential = Get-Credential;Connect-MicrosoftTeams -Credential $credential
- Open PowerShell on your Computer.
- Copy the code block below and paste it into the CloudShell or Powershell window, press enter to run it.
New-CsOnlineVoiceRoute -Identity 02825583002.sbc.nzteams.nz -NumberPattern “.*.” -Priority 1 -OnlinePstnUsages 02825583002.sbc.nzteams.nz -OnlinePstnGatewayList 02825583002.sbc.nzteams.nz
*If you are given a error “Cannot find specified Gateway” please ensure the FQDN has been activated by adding a licensed activation user to the domain.
- Add Voice Routing Policy & Click on Save.
- Add Dial Plan & Click on Save.
- Click Voice -> Dial Plans -> Add
- Name the Dial Plan “Non Local 02825583002.sbc.nzteams.nz” and click save
- Click Add
- Name the dial plan “03 02825583002.sbc.nzteams.nz” and click Add under Normalization rule
- Use these settings for the normalization rule:
Name: “03 02825583002.sbc.nzteams.nz”
Type: Basic - If all selected conditions match:
Tick: “length of dialed number is”
7
“Exactly” - Then do this
Tick: “Add this number to the beginning”
+643 - Click save, then save again *note if you are unable to save the new dial plan enter any character in the “external dialing prefix” field to refresh it, then remove the character and you should be able to save.
- Repeat steps 3-6 substituting area code “3” with area codes “4” “6” “7” “9”
- Add Emergency call routing policy
- Click Voice -> Emergency Policies -> Call Routing Policies -> Add -> Add
- Enter “02825583002.sbc.nzteams.nz” for the name of the Call routing policy
- Enter 111 for the dial string
- Enter “02825583002.sbc.nzteams.nz” in the PSTN usage record
- Click save
This concludes the Trunk Provisioning, continue to allocate numbers to your Trunk.
- Assign Numbers
- Link Numbers, by Assigning Numbers to a User
- Ensure the user you are assigning the number to has adequate licensing by logging into https://admin.microsoft.com/, select users -> active users -> *click the user you wish to assign the number to* -> Licenses & apps. Make sure the location is set and you have a valid license combination added and click save changes. This example uses Microsoft 365 Business Basic + Microsoft Teams Phone Standard
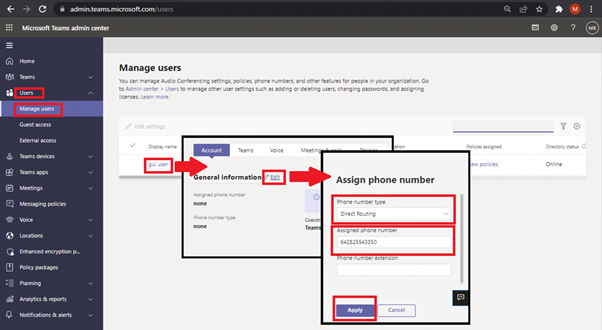
- Navigate back to the Teams Admin Portal at https://admin.teams.microsoft.com/. Select users -> manage users -> *click the name of the user* -> General Information [edit]
- Select “Direct Routing” as the phone number type
- Type in the phone number in the Assigned Phone Number field.
*phone number must be in international format e.g. 02825543350 must be entered in as 642825543350
*Alternatively you can perform this action in the terminal instead using the CLI below
Replace: <UID> with user ID e.g. xxxxxxxx-xxxx-xxxx-xxxx-xxxxxxxxxxxx <DDI IN E164> with phone number e.g. 642825543350
Set-CsPhoneNumberAssignment -Identity “<UID>” -PhoneNumber “<DDI IN E164>” -PhoneNumberType DirectRouting
- Ensure the user you are assigning the number to has adequate licensing by logging into https://admin.microsoft.com/, select users -> active users -> *click the user you wish to assign the number to* -> Licenses & apps. Make sure the location is set and you have a valid license combination added and click save changes. This example uses Microsoft 365 Business Basic + Microsoft Teams Phone Standard
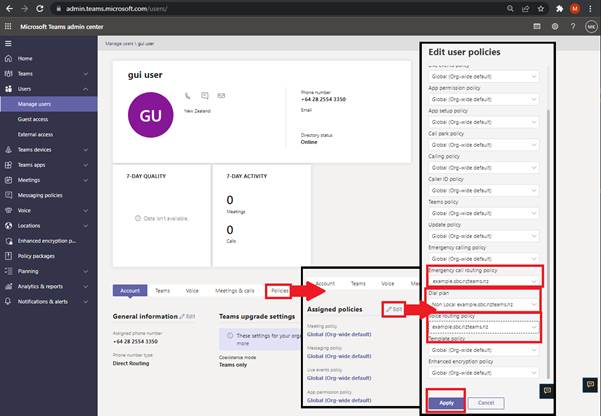
Assigning Policies To A User
Select Policies ->Assigned Policies [edit] -> Please enter:
- Emergency Call Routing Policy: 02825583002.sbc.nzteams.nz
- Dial Plan: <Area code> 02825583002.sbc.nzteams.nz
*for 028 numbers use the “Non Local 02825583002.sbc.nzteams.nz” Dial Plan - Voice Routing Policy: 02825583002.sbc.nzteams.nz
Click Apply
*Alternatively you can perform this action in the terminal instead using the CLI below
Replace: <UID> with user ID e.g. xxxxxxxx-xxxx-xxxx-xxxx-xxxxxxxxxxxx <Area Code> with Area code or Non Local
Grant-CsTenantDialPlan -Identity “<UID>” -PolicyName “<Area Code> 02825583002.sbc.nzteams.nz”;Grant-CsTeamsEmergencyCallRoutingPolicy -identity “<UID>” -PolicyName “02825583002.sbc.nzteams.nz”;Grant-CsOnlineVoiceRoutingPolicy -Identity “<UID>” -PolicyName “02825583002.sbc.nzteams.nz”;
Testing The Service
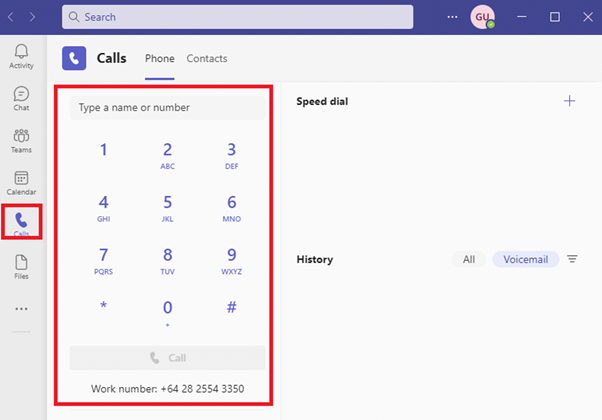
It takes approximately 24hours for a newly provisioned service to be activated.
Once the dial pad appears in the Team Application you should be ready to make phone calls.

Click Save
- You have completed Trunk configuration successfully if you see below, incase you missed a step then please follow edit button.